What Is Needed for Custom Case Design?
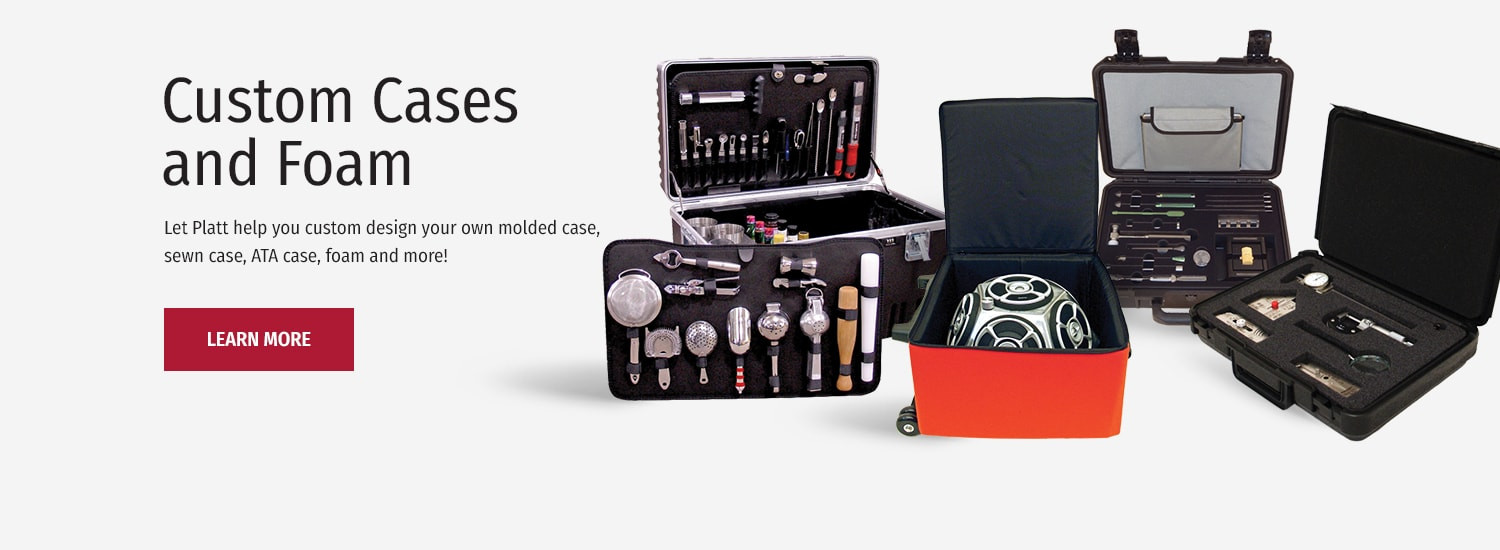
Custom case design is an engineered manufacturing program — not a one-off build. When an OEM, product team, procurement manager, or engineer engages a custom case manufacturer, they're initiating a repeatable production process that must deliver consistent, quality-controlled cases across every unit in a run: whether that's 50, 200, or 500.
This page is for buyers who know they need custom equipment cases but aren't sure what information to bring to the first conversation. The more complete the inputs at intake, the faster Platt Cases can move from inquiry to design concept to approved prototype to production.
Quick Answer
Here is the minimum information needed to begin a productive custom case design conversation:
| Required to Start | Nice to Have — Speeds Quoting and Prototyping |
|---|---|
| Equipment type and what needs to be protected | CAD files (STEP, IGES, or SolidWorks) |
| Overall dimensions (L×W×H) or a physical sample | Complete accessory and component list — cables, chargers, adapters |
| Primary use scenario — shipping, field use, storage, or travel | Environmental exposure requirements |
| Approximate unit quantity: pilot run and annual volume | Branding and compliance specifications |
| Target delivery timeline | Budget guardrails |
Define the Use Case and Handling Scenario
The primary use scenario determines every downstream design decision. A case engineered for laboratory bench storage has fundamentally different requirements than one built for common-carrier freight or daily field deployment by non-technical personnel. Getting this wrong at intake means redesign after prototype.
Handling risks to identify upfront: drop and impact, vibration and shock, compression from stacking or freight, temperature and moisture exposure, and dust or contaminant ingress.
User workflow questions to answer: How often is the case opened and closed? Who opens it — a trained technician or general field personnel? Does it need to be re-packed in the field, or is it sealed at the factory and opened once at final delivery?
Shipping vs. Travel vs. Field Use: How Requirements Change
Each primary use scenario drives different material, construction, and foam decisions. Identifying the right scenario at the start of a custom case design program prevents costly revisions after prototype approval.
| Scenario | Case Style | Foam Considerations | Key Considerations |
|---|---|---|---|
| Common-carrier shipping | Hard case, ATA, or molded | Cushioning depth and density for impact protection | Crush resistance, label window placement |
| Air and ground travel | Hard or soft, ATA road case | Weight is a primary factor — foam density affects total packed weight for travel programs | Airline size limits (62" L+W+H), TSA locks, handle placement |
| Field deployment | Ruggedized hard case | Durability under repeated open/close cycles — layout should support re-packing by field personnel | Dust and moisture protection requirements, re-packing by field personnel, drop exposure |
| Lab and bench storage | Soft or open-top tray | Precision fit and ease of removal — presentation quality matters in professional settings | Component organization and access frequency |
Provide Equipment Details
Accurate custom case design depends on knowing exactly what goes inside — the primary equipment and everything that ships with it. Incomplete item lists are the most common cause of redesigns after a first article is already approved and drawings are done.
- Primary equipment: model name, dimensions, weight
- All accessories packed with the unit — cables, power supplies, adapters, chargers, and remote controls
- Fragility points: screens, calibrated connectors, protruding knobs, lenses, antennas, fiber optic ports
- Moving parts or hinged components that must not be compressed in storage or transport
- Critical surfaces that cannot contact foam — polished optics, coated housings, calibrated interfaces
- Operational constraints: must remain fully assembled, must be stored upright, must stay powered off during shipping
Measurements and Fit Data to Provide
When CAD is not available, dimensional measurements are the starting point for custom case design. Provide all of the following:
| Dimension Input | What to Measure and Why |
|---|---|
| Overall envelope | L × W × H at the widest points in all directions — sets the minimum foam pocket and case interior size |
| Protrusion clearances | Handles, connectors, screens, antenna bases, and knobs — prevent contact damage to protruding components during transport |
| Total weight | Packed weight of equipment plus all accessories — determines foam density specification and case hardware rating |
| Center of gravity | Approximate balance point — informs stacking orientation, primary drop face protection, and wheel placement for heavy units |
| Orientation rules | Upright-only requirements, lid clearance needs, and no-pressure zones — drives pocket geometry and lid foam configuration |
Choose the Best Design Input Method
Platt Cases accepts four types of input for custom case and foam design. The method a buyer provides directly affects quoting turnaround time, first-article accuracy, and how many revision cycles are needed before production approval.
Option A — Send Part CAD
CAD files are the fastest path to an accurate foam design and the fewest prototype revision cycles. Accepted formats: STEP, DWG.
- Include full assemblies with all accessories that will be packed in production units
- Mark critical interfaces, fragile surfaces, and orientation constraints in the file or a cover note
- Simplified geometry works — remove internal mechanisms not relevant to the exterior fit envelope
- Include tolerance callouts and protection surface notes to reduce design review cycles
Option B — Send a Physical Sample or Golden Unit
Physical samples are the preferred input for equipment with irregular geometry, deformable components, or when no CAD exists. The sample is used to verify foam fit after fabrication and before production quantities are cut.
- Ship the sample with a complete accessories list — every item that will be included in production units
- Mark fragile or no-contact surfaces with tape or written notes before shipping
- Include return shipping instructions and timeline if the unit must be returned after measurement
Option C — Provide Pocket Dimensions or a Dimensional Sketch
Dimensional drawings are sufficient for equipment with simple, regular geometry. When using this approach:
- Call out all lid interference points: handles, antennas, raised features that could contact the lid foam
- Include a rough sketch or phone photo — even a low-resolution image accelerates the design process significantly
Option D — Customer-Provided Foam CAD
When the buyer's engineering team produces foam CAD directly, Platt Cases can manufacture to that specification. Manufacturer-ready foam CAD must include:
- Full pocket geometry with tolerances called out per feature
- Layer stack and material callouts for each foam layer — type, density, and thickness
- Revision designation and version control identifier on all submitted files
- Note: Platt Cases verifies all customer-supplied foam CAD against the actual equipment before cutting production quantities — one fit-check cycle is standard even with buyer-supplied CAD
Define Protection Requirements
Protection requirements translate directly into foam material and density selection, case shell specification, and hardware choices. If you have these specs, bring them — if not, Platt Cases can help you work through what matters for your application. Defining protection requirements early prevents costly revisions, but the design conversation is a good place to start identifying them.
| Protection Target | Inputs Needed |
|---|---|
| Shock and vibration | Drop height, transport mode (air, ground, common carrier), and known vibration frequency, if applicable |
| Compression | Maximum stacking weight during storage or freight, pallet configuration if applicable |
| Moisture and dust | IP rating required? Gasket seal needed? Indoor vs. outdoor field exposure? |
| Temperature range | Min and max ambient temperatures during storage and transport — affect foam material compatibility |
| ESD and anti-static | Are components ESD-sensitive? Specify anti-static or conductive foam before design begins — this is a functional specification, not a cosmetic upgrade |
| Abrasion and wear | Frequency of insertion and removal — daily field use vs. occasional travel vs. permanent sealed storage — drives density and pocket surface spec |
| UV exposure | Outdoor storage or deployment? Affects shell material and foam binder selection |
Select Case Platform Requirements
Case platform selection is driven by the use scenario, protection requirements, weight targets, and size constraints. Three primary decisions apply to all custom equipment case programs:
- Hard vs. soft vs. hybrid: Hard cases provide maximum impact and compression protection. Soft cases reduce weight and cost for lower-risk applications. Hybrid builds combine foam-protected hard shells with sewn pockets or accessory pouches
- Portability and handling: Single-person carry, wheeled transport, pallet-ready stacking, or forklift-accessible — each requires different hardware and structural wall specifications
- Security: Padlockable hasps, keyed locks, TSA-accessible locks for air travel programs
Interior Layout Needs
Interior layout drives foam design more than any other single input. Define the following before the custom case design begins:
- Single device vs. multi-component kit: How many items share the case? Are all accessories always packed together?
- Access pattern: Quick-access lid layout — everything visible and removable in one motion — vs. layered tray system for maximum packing density
- Modular requirements: lift-out tray inserts, document pockets, spare parts compartments, tool holders, accessory pouches
- Re-pack complexity: Can field personnel re-pack correctly without training, or does foam design need to guide re-packing with clearly shaped pockets and sequenced layers?
Foam Design Requirements
Foam is where custom case design succeeds or fails at the equipment protection level. Platt Cases manufactures custom foam inserts using waterjet cutting and die cutting — producing repeatable inserts that hold consistent dimensional tolerances across every unit in a production run.
Foam design priorities to define upfront:
- Protection level vs. weight vs. per-unit cost: These create real tradeoffs in density and material selection — identify the primary driver
- Pocket design details: finger-pull channels, cable routing paths, label recesses, multi-layer insert strategy
- Serviceability: replaceable insert layers for high-wear pockets, spare parts access without full unpack, field-swap capability for consumable foam sections
Foam Material Selection Guidance
| Foam Type | Best Application | Density Profile | Program Notes |
|---|---|---|---|
| Polyethylene (PE) | Impact absorption, industrial, and field programs | Firm, high-density options available, closed-cell | Standard material for OEM and production programs at mid-volume |
| Polyurethane (PU) | Convoluted lid lining, light cushioning, low-risk equipment | Soft to medium density, open-cell | Lower cost, shorter wear life under high-frequency open/close use |
| Cross-link PE | Precision fit, medical, and aerospace programs | Firm, closed-cell structure | Moisture and chemical-resistant |
| Anti-static / ESD | Electronics, PCBs, sensors, calibrated assemblies | Varies by protection requirement | Required for ESD-sensitive equipment — a functional specification, not a cosmetic choice |
See also: Custom Foam Inserts | Custom Foam Overlay
Designing for Repeatable Manufacturing Runs
A foam design that fits correctly in a prototype must produce the same result across every unit in a production run. Designing for repeatability means:
- Machine-cut foam inserts — every unit in a production run comes out exactly the same
- Revision control: foam design files are version-controlled and archived at Platt Cases — reorders match original approved specifications without requiring a new first-article cycle
Branding, Identification, & Documentation Inputs
For OEM programs and private-label production, branding and identification requirements must be defined before prototype — not after. Exterior branding changes made after drawings and specs are done add cost and lead time that a complete intake brief prevents entirely.
| Category | Options Available | Input Required From Buyer |
|---|---|---|
| Logo and branding | Screen printing, decal, engraving, label plate, molded-in logo, Pantone color match | Vector logo files, Pantone codes, placement specification, and approved artwork files |
| Identification | Asset tags, serial number labels, barcode and QR placement | Label format, serial numbering scheme, and regulatory requirements |
| Documentation | Manual holder, quick-start guide pocket, SDS sheet, pack-in insert, inspection label | Document size, quantity per unit, whether the document must be replaceable or permanent |
Volume, Timeline, & Program Constraints
Quantity and timeline are not logistics questions — they drive material selection, tooling decisions, and unit economics from the first design conversation. Provide these inputs as early as possible:
- Pilot run vs. full production volume: Platt Cases' mid-volume sweet spot is 10 to 100+ units per production run
- Needed-by date: prototype approval milestone, first production delivery date, phased rollout milestones
- Reorder cadence: programs with predictable reorder schedules can be planned with archived tooling and pre-purchased raw materials, reducing lead time on subsequent runs
- Budget guardrails: identifying cost constraints at intake enables smarter material and design tradeoffs — rather than discovering them after quoting is complete
Tooling and Manufacturing Method Impacts
Manufacturing method determines schedule flexibility, per-unit cost at volume, and how easily the design can be revised after production begins. Match the method to the program requirements, not just to the cost of the first unit.
| Method | Lead to First Article | Revision Flexibility | Best Volume Range |
|---|---|---|---|
| Waterjet-cut foam (fabricated) | 2–3 weeks | High — update file, re-cut | Any volume; preferred for pilot runs and mid-volume programs |
| Die-cut foam (high-volume) | 6–8 weeks | Low — new die required for geometry changes | 200+ units where per-unit cost must be reduced |
| Fabricated ATA | 2–4 weeks | High — no hard tooling required | 10–100+ units; custom geometry without mold investment |
| Injection or blow-molded case | 10–12 weeks | Low — tooling changes are costly and slow | 1,000+ units; justified when volume economics require it |
Common Mistakes That Slow Down Custom Case Design
How Platt Cases Uses Your Inputs
Once requirements are submitted, Platt Cases moves through a structured program sequence with defined buyer approval points at each stage. No stage advances without a written sign-off from the buyer.
Talk to a Custom Case Manufacturer About Your Program
Platt Cases designs and manufactures custom equipment cases for OEM product teams, engineers, and procurement managers who need 10 to 100+ units delivered to specification and built to repeat. The fastest path to a quote is the most complete set of inputs: CAD files, dimensional drawings, or a physical sample of the equipment.
If the program is still being scoped, a design consultation is the right first step. Bring the equipment, the use scenario, and a quantity target — Platt Cases will handle the rest.
Request a Custom Case Design Consultation
Ready to start your custom equipment case program?
Platt Cases works with OEM product teams, engineers, and procurement managers to design and manufacture custom cases from 10 to 100+ units. Send CAD, a physical sample, or dimensional drawings — or start with a design consultation to scope your program.